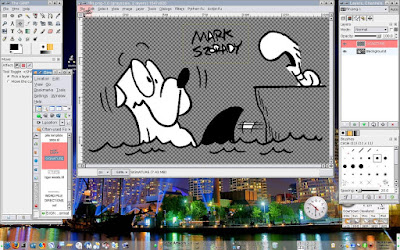
 I've been using the Gimp now for a few years and have really come to love it. Since getting my larger 22-inch flat panel, The Gimp has become much easier to use.
Gimp makes use of floating tool panels. One panel for bushes, eraser, paint bucket and other tools. another panel handles brush size, navigation, layers,etc. And a main panel that houses the image you're going to edit.
These panels tend to cover one another up. You can tweak and improve the interface as I mentioned in an earlier blog, but having a larger monitor is the best way to tame Gimp. The extra screen real estate really allows you to spread things out. Panels no longer get in the way of each other.
Because these floating panels leave areas to the desktop unobscured, you can grab files and folders from your desktop on the fly. You can drag and rdrop files onto the "File" menu selection in Gimp and the image will open.
This brings us to our Gimp Tip. Many image editing programs have a library or "scrapbook" where you can store images for future use. You can then open this scrapbook (within the image editing app) and drag and drop the image into the image you're working on(usually as a new layer).
You can easily create a scrapbook for Gimp and store images for future use to edit and incorporate in all your photo projects.
On your desktop, create a new folder. I call mine "Gimp Artwork." This folder is where you'll store all your scrapbook images for Gimp.
Gimp's native file format is .xcf. The Gimp .xcf file format allows you to store all layers, transparency and other image information. You can save images toyour scrapbook in any image format (and I do this, as well), but for our purposes, we'll be saving single layer images as .xcf files. Using .xcf assures that certain properties (text editing layer, transparency, etc.) will be retained.
Now, when you have an image that you wish to use on a future Gimp project, simply save it in your Gimp Artwork as an .xcf file. The next time you need the image, simply open this folder on your desktop (it helps to change the folder view to image thumbnails), and drag and drop the image onto the Gimp File menu of the current image being edited. You can see how this is being done in the above image. The areas of interest are highlighted in red.
This newly introduced image will be imported as a new layer. And the great thing about this method is, you always know where your scrapbook is. It's easy to find and easy to backup. Whereas, with other image editors that utilize an internal scrapbook, you have to really hunt around on your hard drive to find the specific folder where all those images are stored.
I keep my Gimp scrapbook on my desktop and leave it in between Gimp's tool panels. When I need an image, I open my scrapbook folder and drag and drop onto the "File" menu." The image opens as a new layer in the image I'm currently working on.
If you've never tried Gimp, it's easy to obtain. It's free with every Linux distribution. So, Get Linux and get Gimp.

No comments:
Post a Comment